

*This post may contain affiliate links, which means I’ll receive a commission if you purchase through my link, at no extra cost to you.
Learning how to host a website was probably the first most difficult thing I had to understand when it came to making websites.
I had to get something called a domain name and then I still needed a web host?
What were all these things and how do I get them?
Luckily I had someone to help guide me along the way.
A few months after I graduated from college I was reconnecting with an old college buddy of mine.
We were catching up on life and I asked him how business was going.
Little did I know that would be the key question that would open the door to my life as a web developer and business man.
He operated what started out as a graphic design freelance business then transitioned to doing web design for different clients.
We were talking and because we were cool he showed me how much he had in his account.
I thought his business was doing well and he was organized with his finances, but what he showed me next blew me completely away.
He showed me how much he had in his savings account and I couldn’t believe it.
He had managed to save up to $10,000 dollars.
Now I had heard of people who made that kind of money and the kinds of job they had to make it, but I had never known someone personally making that kind of money…
from his own business!!!

I was working a low paying job doing inventory for different companies and I was barely scraping $10/hour.
Of course he had saved this money over time, but this was just his savings account.
He still had money in his checking account.
I was hooked, I had to learn how to make websites since my college education seemed to fail me and what he was doing was working.
What I saw told me there was a demand for web services.
Fast forward I started learning how to build websites and slowly gaining clients, but I will never forget that moment.
That was the introduction to my journey into web development.
When I first got started though I had no idea of what I was doing.
Then, when I really started learning how to code I had to figure out the basics like hosting a website.
It seemed difficult at first but eventually I got the hang of it and now I want to share how you too can host your very own website.
Especially if you coded your own website.
Have you ever wondered how to upload your files on your web host?
Don’t worry you will learn how to do that as well as a few other bonus goodies.
When you’re done with all this you will feel confident in your developer skills or…
You will at least know the different ways how to host your own website.
Ready to get started?
Below you will find a list of what you’re going to learn and if there is something you want to learn first then you are more than welcome to jump to that section.
I tried to answer any questions you might have had when developing a website.
I know I had these questions when starting.
What You Will Learn:
- The Basics of Web Hosting
- How To Host Your Own Website
- Hosting A WordPress Website
- Secret Way To Host A Website On Github
- How To Host A Website If You Have A Domain Already
- 10 Different Ways To Host A Website For Free
The Basics Of Web Hosting
So you just finished developing your first website from the ground up?
You used your HTML, CSS and Javascript skills and now you want to show them off to the whole world and not just through your portfolio or social media.
You want your site to have its own domain name, but how do you do that?
One word…
Hosting
You need to host your site in order for your site to be seen, not just from your local computer, but live on the internet for others to see.
I know some of you may know what hosting is, but for those of you who don’t, I would like to start things off with a quick introduction to what it is.
If you’re gonna be a developer this is one of the essential things you should know.
This will help you to navigate around your hosting provider easier.
I won’t dive too deep into it in this post, but if you want an in depth guide to what is hosting and the different types of hosting, then check out this guide for more info.
What Is A Web Hosting Site?
So to define a web host in its most basic terms:
it is how others can access your website online.
Let’s think about all this in terms of real estate or building a house.

Let’s say you want to build a house, but in order for you to build that house you’re gonna need some plot of land.
That plot of land is the host.
The web host provides the space needed and required to put everything you want in your house.
But the next question is…
“How do people find your new home?”
This is where the domain name comes into play.
The domain name, or URL, serves as the address to your new home.
When someone types in your domain they can now find your new house, or website, and you now have your website ready to go.
This is a very basic overview of how hosting, domain names, and your website works together.
Again, if you really want an in-depth look check out this article here.
Now let’s get to the juicy stuff

How To Host Your Own Website
So now that you know what a web host is…
How do you host a website?
Well I’m glad you asked.
By the way If you want a great hosting provider I personally use HostGator for years and haven’t had any problems with them.
So before we begin I’m going to start from the perspective of a developer.
What this means is if you coded your own website I’m going to show you how to upload your files to your host.
If you want to know how to do this with WordPress you can check out how to host a WordPress website here.
I’ll take you through this short simple process in order for you to get your site up and running.
The steps in this post should be fairly simple and easy to follow to place your files on the server or host.
I am already going to assume you know how to get hosting from a hosting provider and if not check out this post on how to buy hosting.
Anyways moving forward.
So if you already have your hosting you now want to place your files online.
How To Host A HTML File
Ok so I am going to assume again that you already have your coded website finished already and you’re ready to upload this bad boy to your host.
For these examples I’m going to use my web host HostGator since this is what I use.
However, if you use another host the process is usually the same, the only difference is where you access the files.
Ok first thing is first…
Step 1. Login To Your Control Panel
The first thing your going to do is log into your control panel which will look something like this once logged in…
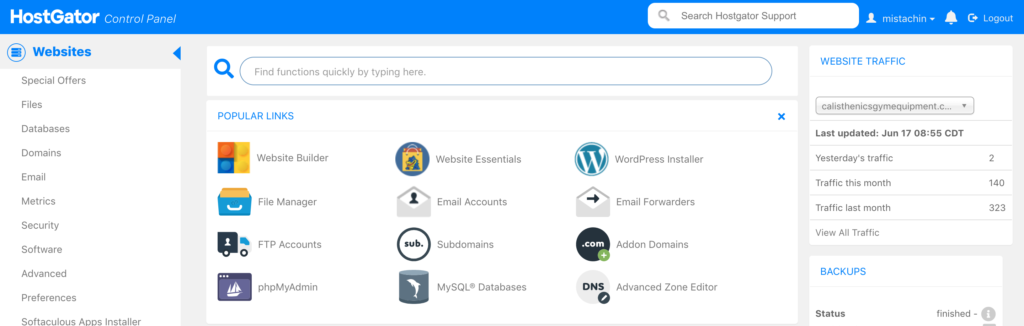
Once you’re in the control panel you’re going to want to locate the files manager tab which should look similar to the image below.

Once you have accessed this panel it will direct you to an interface.
*Again if you are using another hosting platform all control panels should look about the same.
Once you’ve opened the file manager, it should automatically direct you to the folder that your domain is under.
If not locate the folder name of the domain for your site.
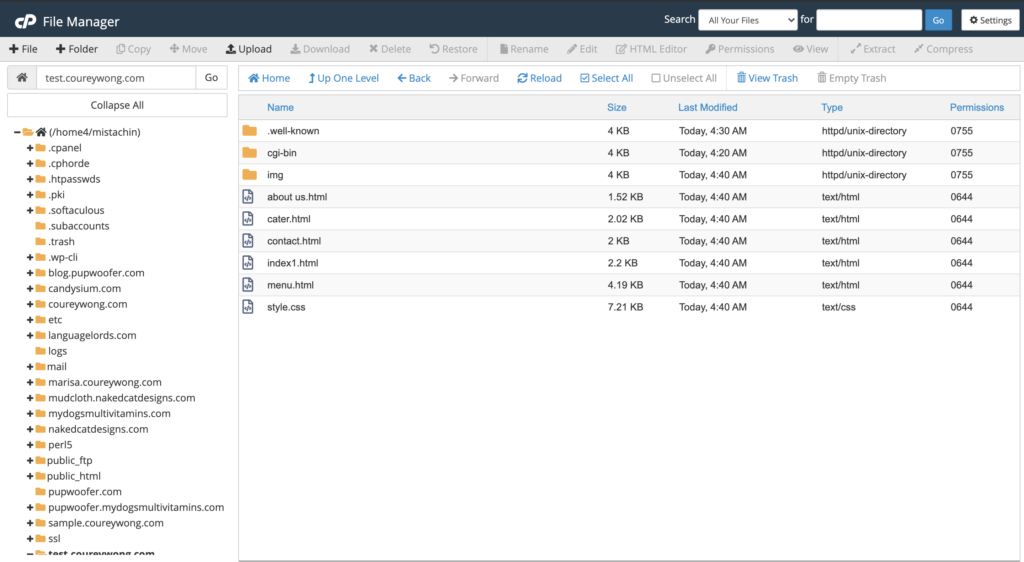
If you just bought your hosting the panel should look empty, unlike mine.
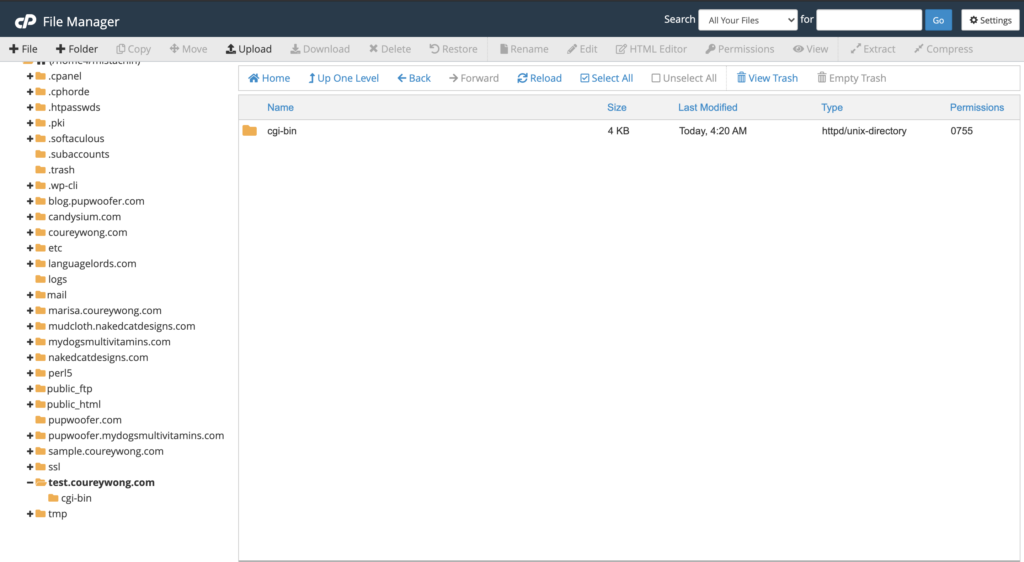
To the right you will see the contents of the folder which should only include a cgi-bin folder.
This folder in there is perfectly fine.
Don’t delete it because it’s needed for your browser to read scripts.
Besides that nothing else should be in there since we haven’t added anything yet, but that’s coming up next.
Now this is where the fun begins.
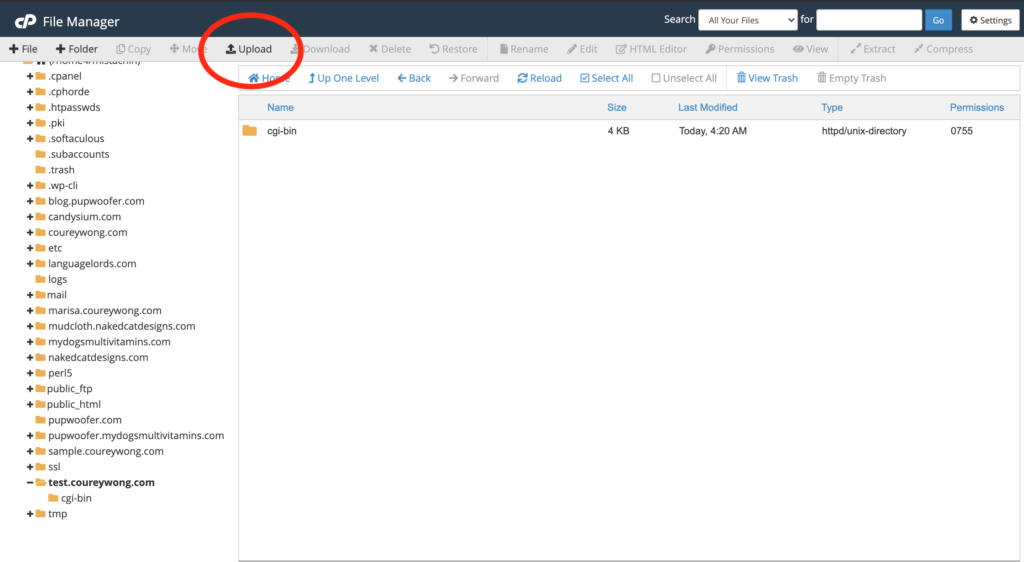
Step 2. Upload Your Files
You’re gonna want to find the option to upload your files.
Locate the upload button and find all the files you developed and import them to your site.
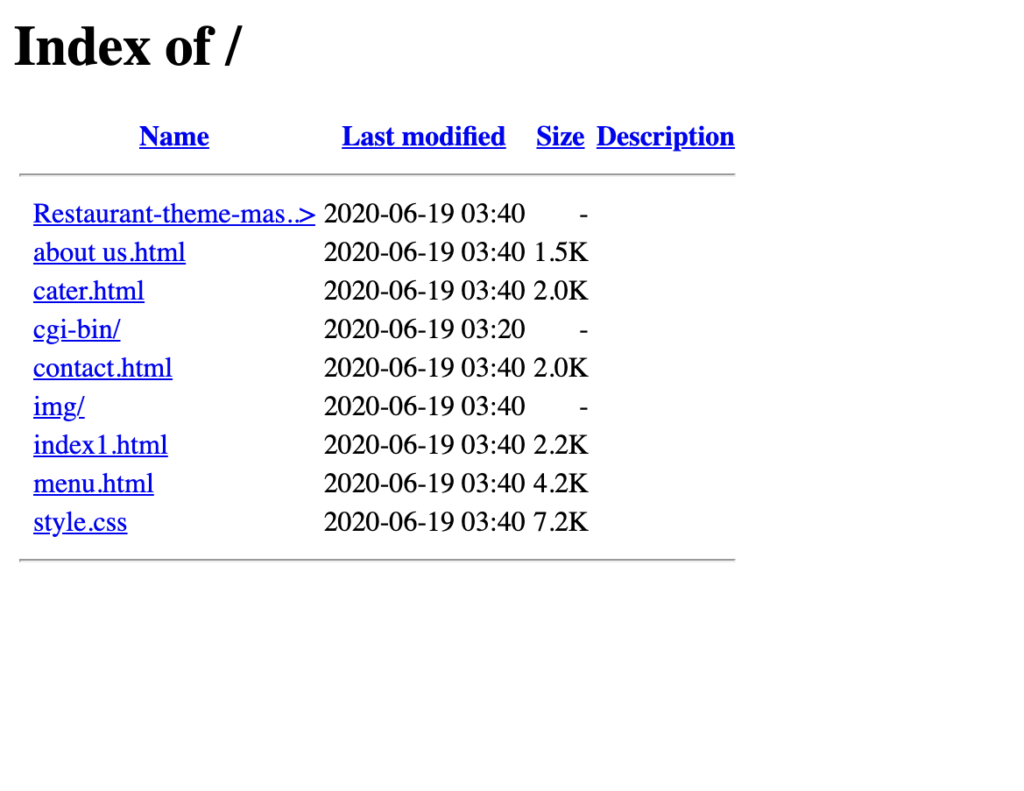
Make sure the page you want to be your home page is named index.html.
The index.html is gonna be stored as your home page whenever someone tries to access your site.
If not, the host will not know what page is the home page and it will show an “Index of /” error page, like the image below…
This means it can’t find which page is your home.
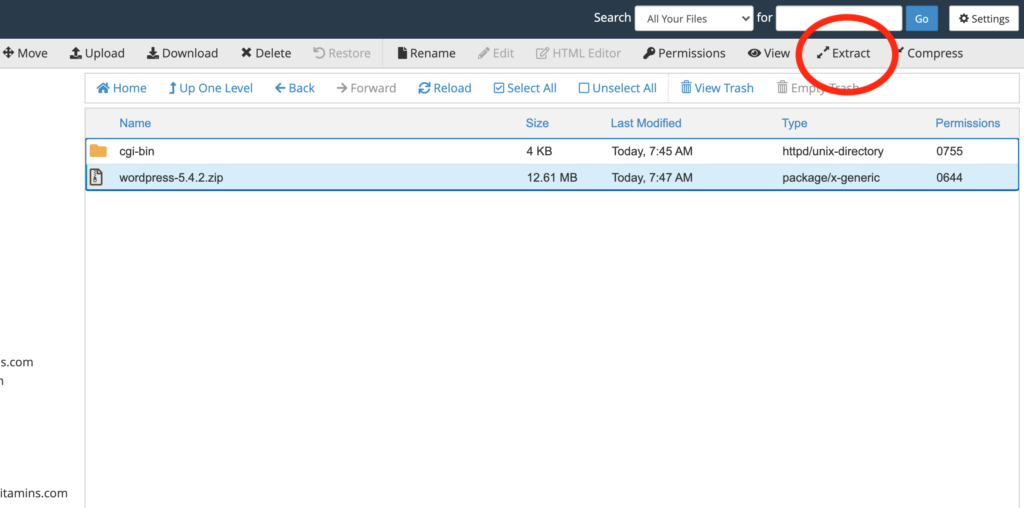
Special note: if you upload a zipped file, once it’s done uploading you’re gonna have to extract the files and move the files in order for the host to be able to find the files properly.
Be sure the files are in the root folder and not in any sub folders.
What I mean by this is when you open the main folder of your domain name, the same folder where you saw the cgi-bin.
You want the files to be located there if not it is not going to find the files.
Your folder should look something like this…
If all your files are located in the root folder and they are named, as well as linked properly then your ready for the final step.
Step 3. Watch The Magic aka Check Your Site
Once your site has been properly uploaded to your host it is now time to see your work live.
Open a new tab and type in the domain name you registered for your site.
Your site should now be visible.
If not double check your files and see if you might have placed them in the wrong folder.
That’s ok, this happens sometimes.
I know I have done it and tripped up many times.
Just retrace your steps and find the correct folder to place them in and your site will be live.
The first time doing this may seem complicated but once you get the hang of it your good.
I know when I first uploaded my site to my host I was ecstatic that I figured out how to build a website and then put it on my web host server for others to see.
Now you know how to upload an html file to your host.
Now let’s go over how to do this with a WordPress site.
Hosting A WordPress Website
The process of hosting a wordpress site is pretty simple.
In fact, it might be a little easier because the process is built into the hosting platform now a days so you don’t really have to do it manually.
But with that being said there are 2 ways you can host a WordPress site.
Since we just finished showing how to upload an HTML file we’ll go over the first way which is manually.
Hosting WordPress Files Manually
Ok if you just finished reading the first section of how to upload an html file we are going to follow the steps similarly.
Just for the record you don’t need to know how to do this since most platforms make it easy to install, but its always good to know especially if you’re learning web development.
Step 1. Upload WordPress Files
Ok instead of the files of a site you just coded, for a WordPress site you’re gonna need to upload a theme.
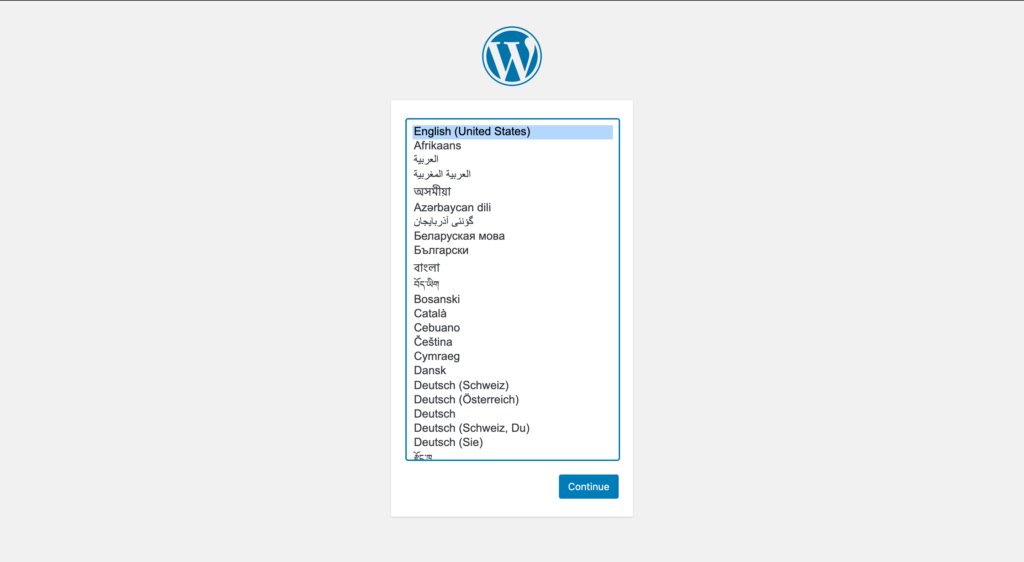
Therefore, you’re going to need to Download WordPress first to upload to your file manager.
Once you download wordpress upload it to your file manager.
Don’t forget to extract it from the zipped folder and move it to your root folder.
Remember that’s the folder that contains the single folder with the CGI-Bin.
Once you have uploaded the files and moved them to the root folder here comes the tricky part…
But don’t worry we’re going to get through this together.
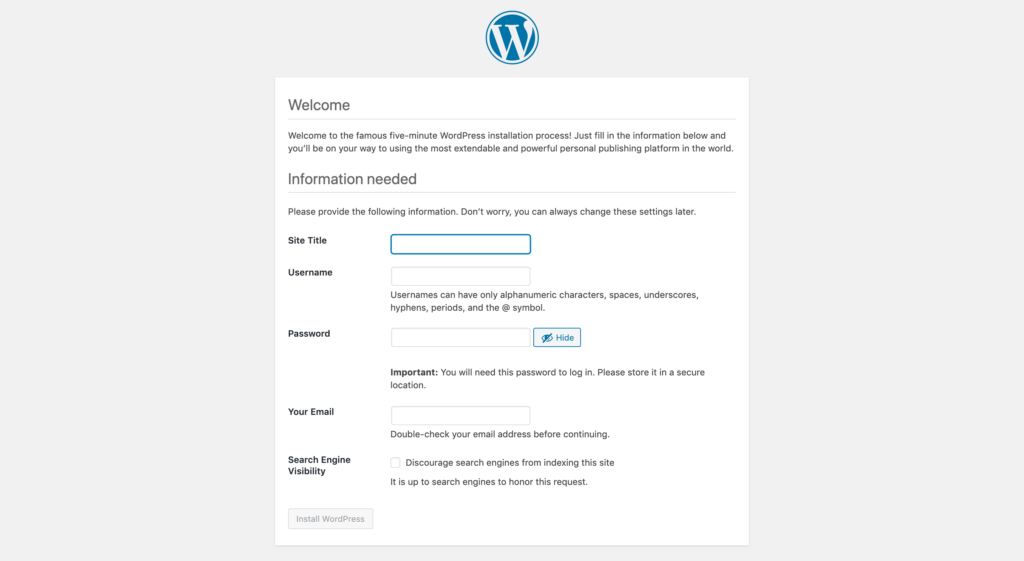
Step 2. Create A Database
When you install WordPress manually you have to create a database.
Along with that database you need a username and a password.
I know it sounds difficult, but it’s easier than it sounds, especially since they made a database wizard to simplify the process.
Ok, head back to your cpanel, control panel for short, and look for the database wizard icon like so…
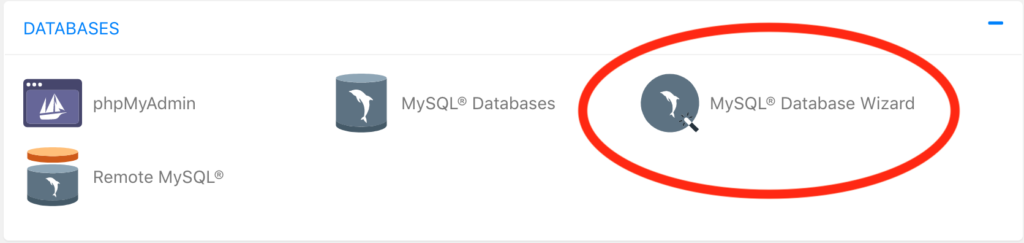
Follow the prompts to create the new database as well as the new user and password.
*When creating the user be sure to check All Privileges when it asks you.
Once you have created the new database you’re gonna need to copy the database name the username and the password for the next steps.
Step 3. Configure Your wp-config File
Ok if you created the database head back over to your file manager and locate the file named “wp-config-sample.php“.
Rename it so its only says “wp-config.php“.
Then once you finish renaming it open the file so it can be edited.
After you have opened the file look for a section that looks like this…
define('DB_NAME', 'database_name_here');

	/** MySQL database username */
	define('DB_USER', 'username_here');

	/** MySQL database password */
	define('DB_PASSWORD', 'password_here');
This is where your going to copy and paste the database username and password.
*Make sure there is no spaces before or after your database name, username, and password*
After you replaced the information click save and close.
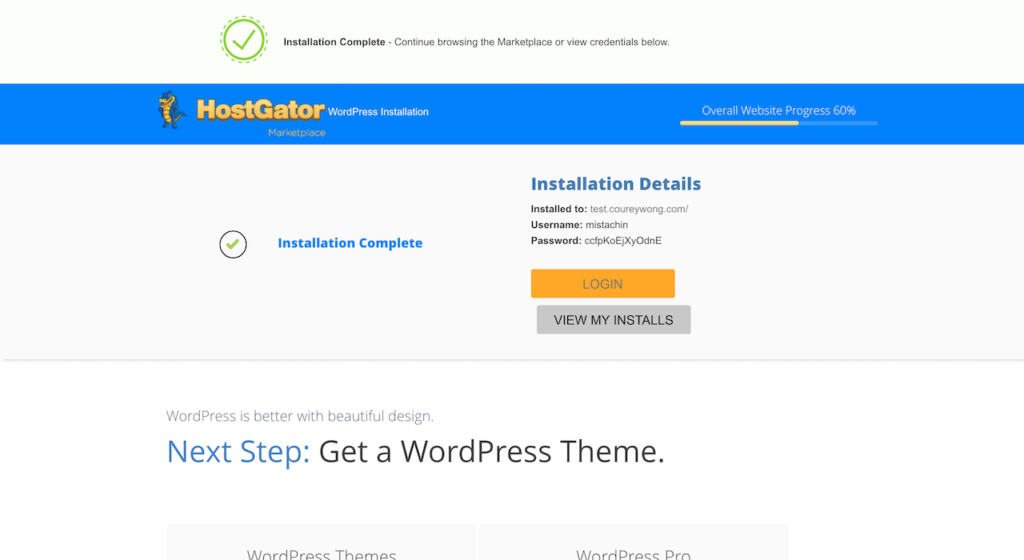
Step 4. Access Your Site
Now its time for the magic again.
If you have correctly put everything in place, open up a new tab and head on over to your domain.
It should direct you to a url that looks something like these two options
https://example.com/wp-admin/install.phphttps://example.com/yoursubfolder/wp-admin/install.phpWhich you should then see a screen that looks like this…
If you see this then congratulations you have successfully installed WordPress manually.
Clap it up.

We’re not done yet, but we’re almost there.
Next enter your credentials on the next page
Save them for your reference to login and you now have WordPress installed on your hosting.
Last but not least you will need a theme for your WordPress site and you should of course know how to install it.
Step 5. Installing A WordPress Theme
Ok so since I said there are 2 ways of installing WordPress I didn’t want to be redundant when in comes to explaining how to install the theme so for step 5 click here or the button below.
How To Install WordPress with Quick Install
Ok since WordPress is like the number one platform when it comes to building a website online most platforms have made it fairly simple to install.
Step 1. Login to your cpanel
Once you login into your cpanel your going to look for the icon or the tab that says something like WordPress installer.
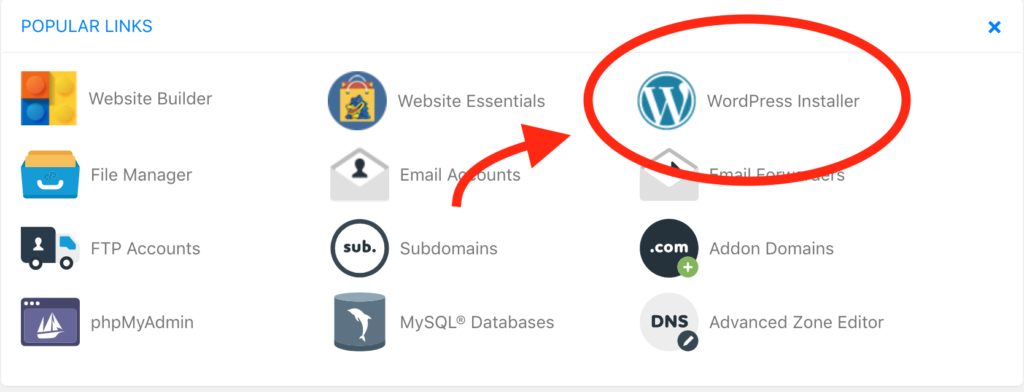
Again I’m using HostGator so if your cpanel is a little different look for something that is similar to a WordPress quick install.
Once you find it click on it and your one step closer.
Step 2. Create A User
It should be pretty straight forward from here.
Your screen should look like this…
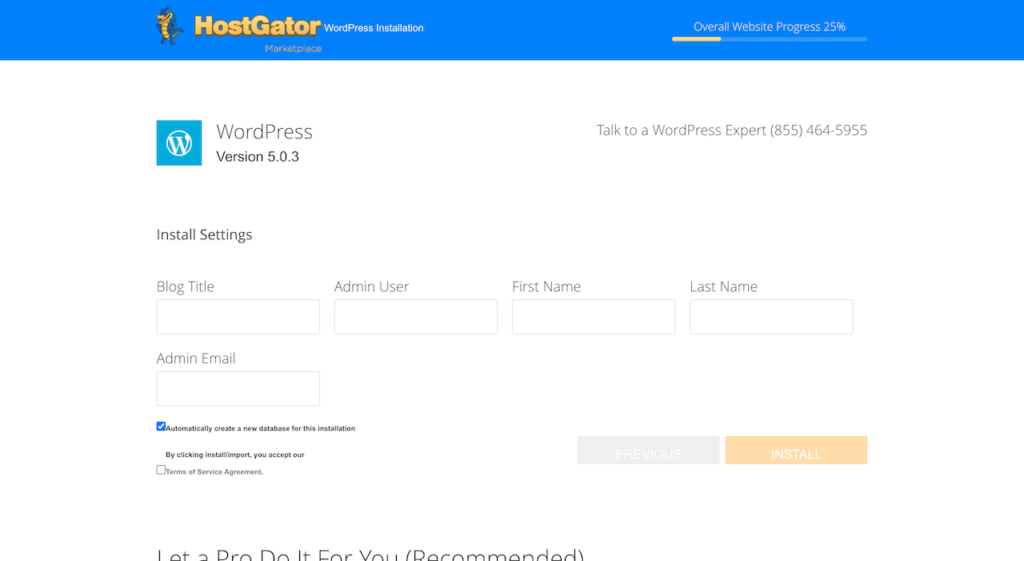
Enter the name you want to call your “blog” and create your admin username and your email.
WordPress will create a default password which you can change later but when your done click next it will begin the installation.
Once its done be sure to write down your username and the password it gives you because you will need it to login next.
Step 3. Login and Install Your Theme
Ok if all has gone well it is now time to login to your new wordpress site.
You should be directed to the following page and if so click on the button that will direct you to the login to your new site.
If you want to keep that page open while you access the login page for your site be sure to open it in a new tab.
This way you won’t lose the password they’ve given you, but write it down because you’re about to use it.
Step 4. Installing Your Theme
Alright after logging in you should now be up and running and now the final step is installing your WordPress theme.
If you have your theme ready, or if not check out Themeforest they have a great selection of themes.
Then on your WordPress dashboard look for the tab on the left side of the screen that says appearance.
Hover over it and there should be an option that says themes.
Click on it and it will open up the themes page.
Locate the tab at the top and that says Add New.
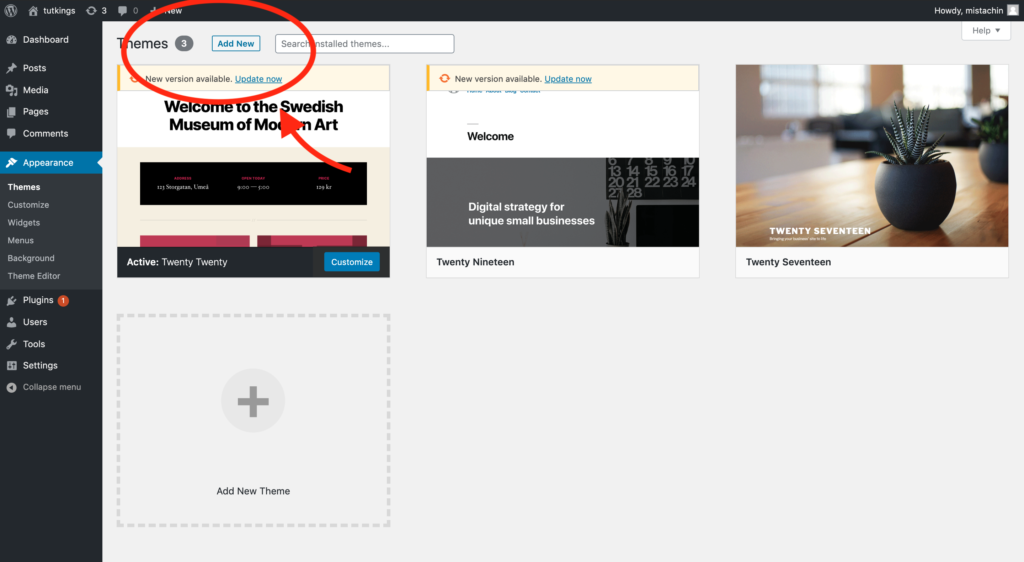
Add your theme’s zipped folder, let it upload, and then activate it.
You have now installed WordPress and uploaded your new theme.
You can now start building out your website.
Ok so you now know how to host your own coded website and even upload and install wordpress.
You should feel like a boss because that’s a lot we got accomplished, but as a web developer there are other ways that we can actually host a website.
It’s pretty cool when you just want a quick and free way to host any coding projects you might have been working on.
This free way of hosting a site is with good ol Github.
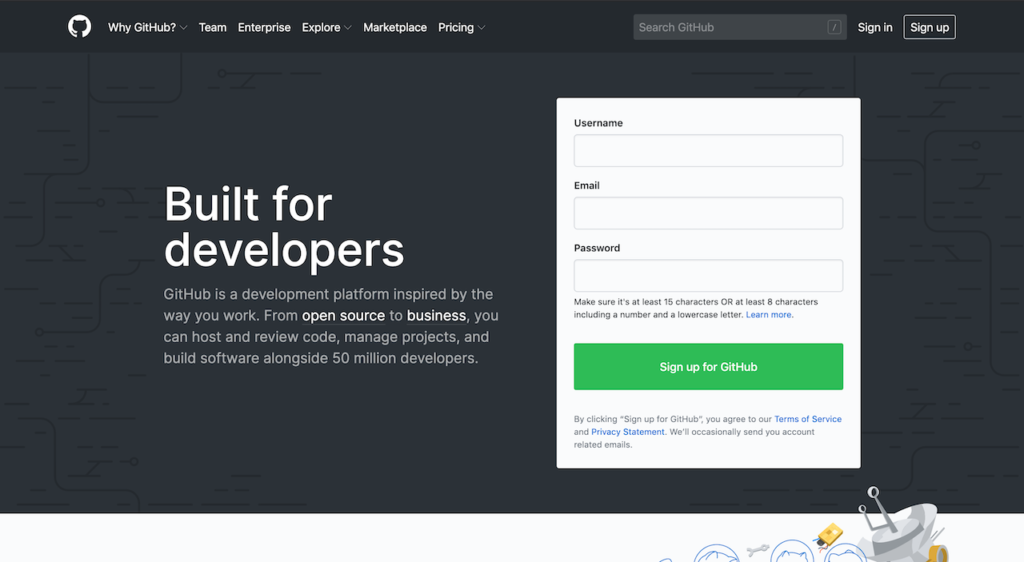
How You Can Host A Website On Github
So as a developer, Github seems like the place to be for all developers to either post their work, gain inspiration, or what its really known for…
Collaborating with others.
All to say Github was a place to go and post your code so others could see your code.
But there is a secret I’m not sure everyone knows about.
Did you know you can actually host your site on github?
Let’s say you finished a project and you want a way to put it up and you don’t necessarily have hosting, which if you are looking for one have you thought about HostGator?
Anyways you can actually host your coded project on Github and actually share that link with others and you have a functional website.
For example, check out this resumé project I made and hosted it on my Github account
👉🏼 https://coureywong.github.io/Resume/
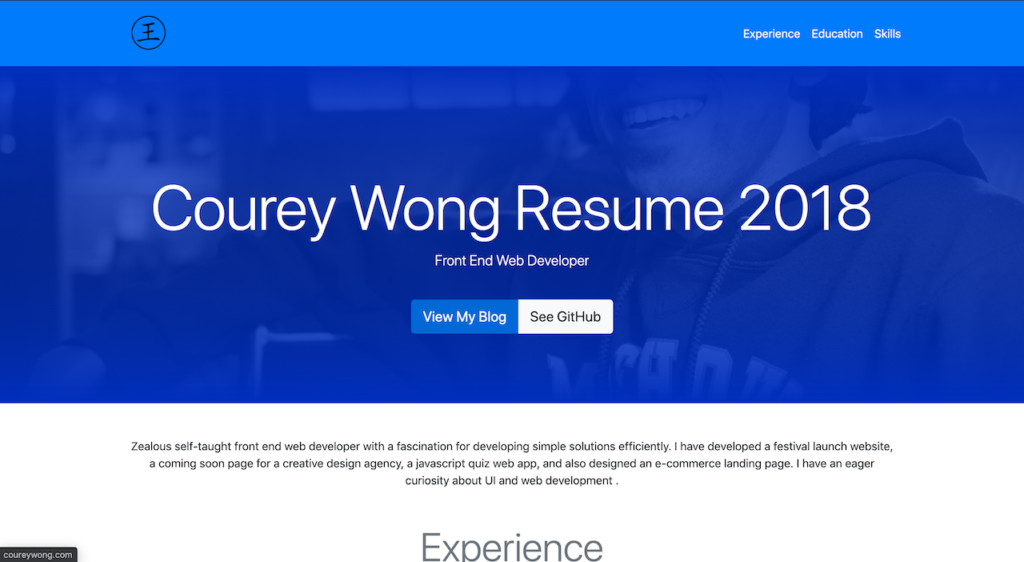
As you can see the link is a subdomain of Github, but you are able to show your work easily.
So let’s go over how you can do the same thing.
Step 1. Get an Account
This might sound obvious but you will need an account which you can get here.
No worries it’s absolutely free and if you are looking into getting into web development its a great place to put your code up for others to find.
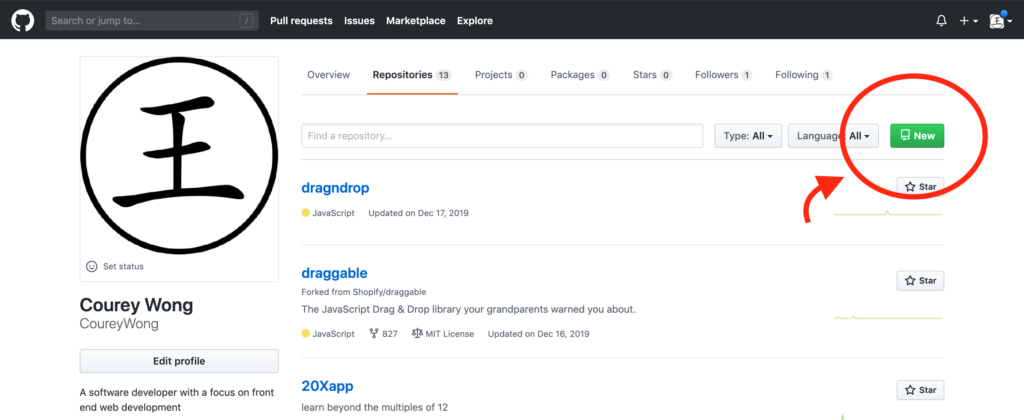
Step 2. Create A Repository
Ok once you created your account you should end up on a page that looks something like this…
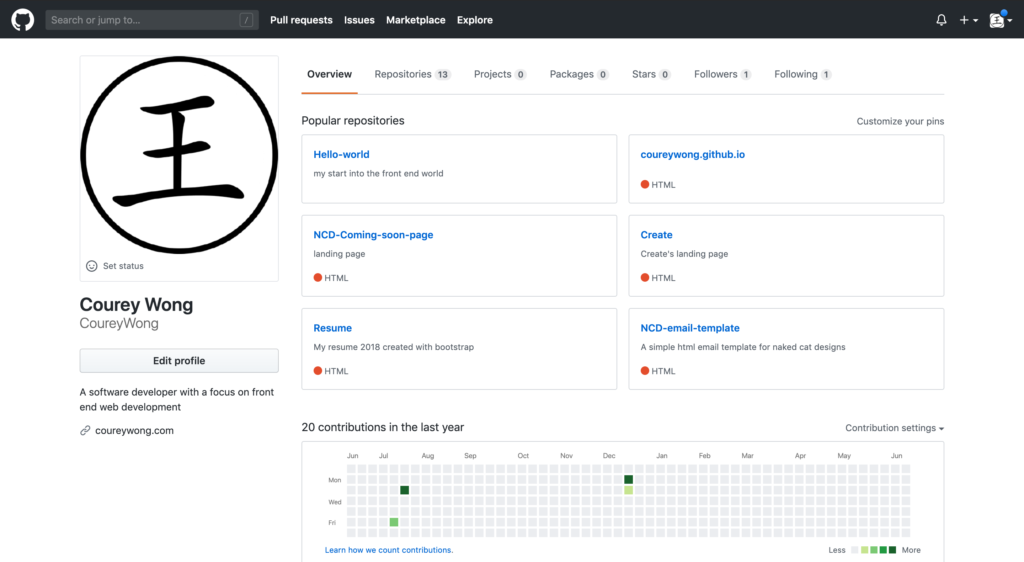
The next thing you need to do is add the coded project you want to what they call a repository, which is right next to the overview tab at the top.
Once in the repository section look for the green new button to create a new repository.
You will be taken to the following screen…
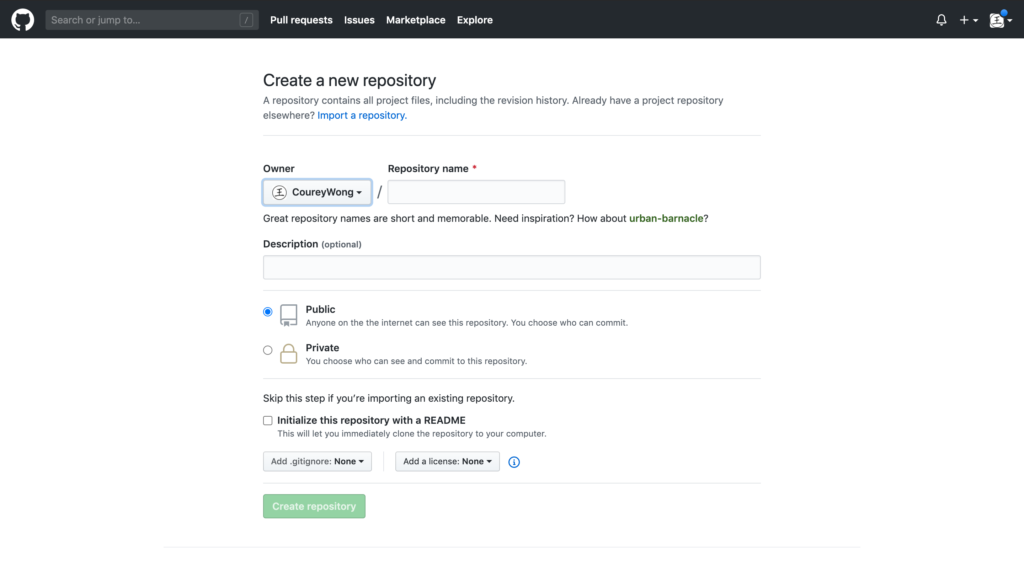
This is how others will be able to see your work if you choose to make it public if not you can make it private.
Fill out the information and check the box to initialize the repository with a README doc since you won’t be importing an existing one.
The README doc acts as a manual to the code your uploading, so you can check that out later.
Step 3. Upload your Code
Now it’s time to upload your work, are you excited we’re almost there?
This part can be a little tricky because they do have a way for you to upload your code through the desktop version.
To make things easy we will just upload it directly on the site.
Look for the button that says upload files
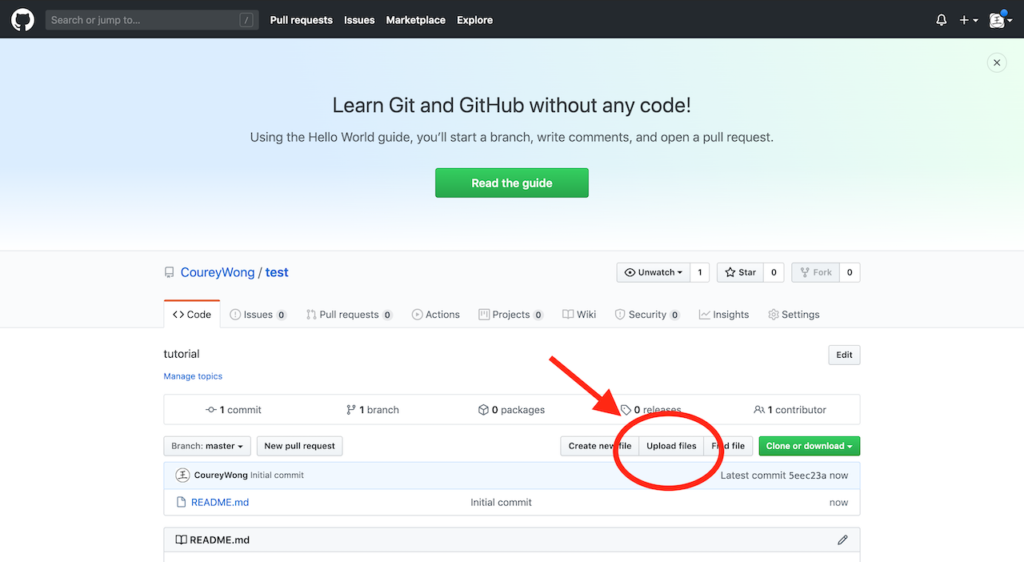
If you would like to learn how to do the desktop way of uploading you can check out the guide here.
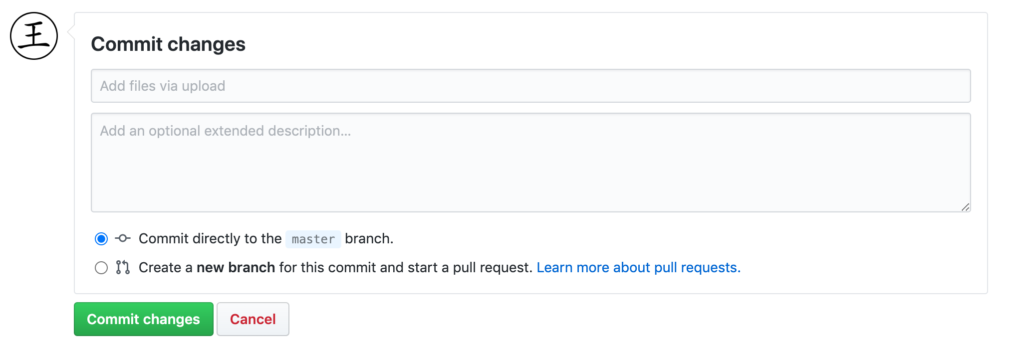
Once you have been taken to the page to upload files, add your coded files and once they are done scroll down and press the green commit changes button.
Congrats you have now uploaded your code to the repository.
Are you ready for the next step?
Step 4. Make Your Site Live
Time for the fun part.
How to make your site live.
After you have commited your changes you will be taken back to the main screen of the repository.
Look for the options of the top nav menu that says settings
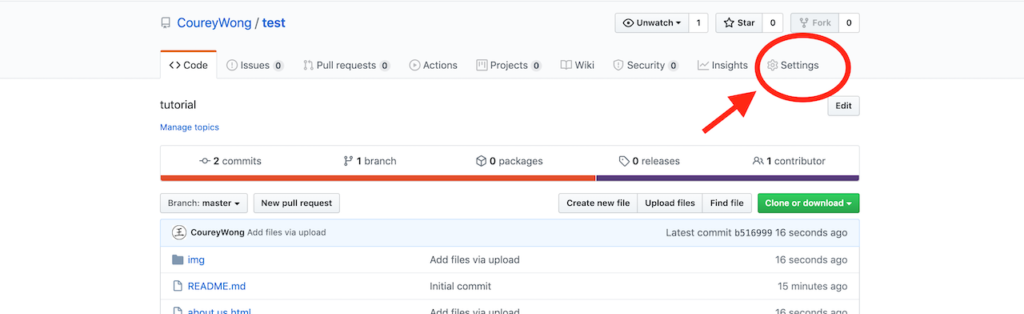
Then scroll down until you see a section called GitHub pages
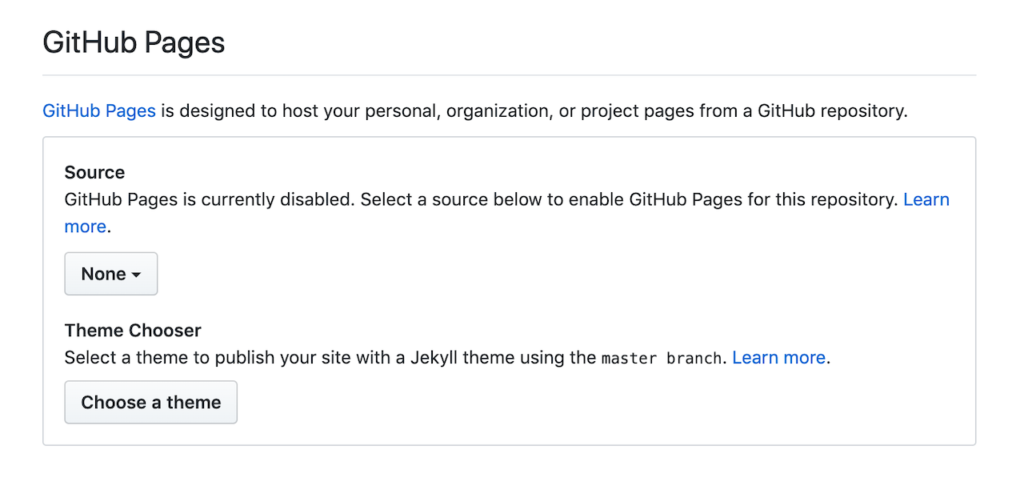
Then under source choose the source which will be the master branch.
Once you select it the page will refresh and then scroll back down and you will now see your new link for your new page.
Copy that link and then return to the repository you just made.
Look for the button that says edit.
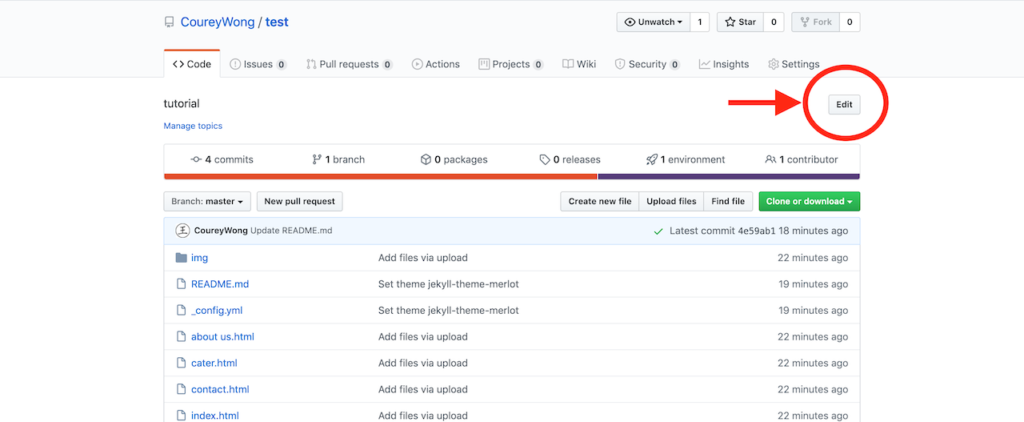
Once pressed it will give the option to paste your new link to your website…

Paste it, then press save and…
Wallah!
You now have a free hosted website on GitHub.
Congratulations how does it feel?
Let’s keep it rolling shall we got a lot accomplished but there is still more we can do in regards to hosting a website.
For instance…
Do you already own a domain name?
Then the next section is exactly what you need.
How To Host A Website If You Have A Domain Already
So we talked of a couple of ways how to host a website from how to host your own website, then with WordPress, and then with GitHub.
This section will be a simple how to get your site up and running if you already have a domain name.
Meaning if you are just trying to connect your website to your domain name.
There are multiple definitions this could mean…
For example, if you bought your domain name with another domain registrant and you want point it to another company.
That would be dealing with changing name servers, or a domain transfer, but I am going to keep it simple and assume you have bought your domain name and hosting with the same company.
So to begin, if you only have one domain name then it is fairly simple because when you bought the domain name it should already be associated with that hosting.
What I mean is the name servers should already point to the hosting you have purchased from your hosting provider.
Now if you’re like me and you have multiple domain names under one shared plan, then you might need to do one more step to ensure that your domain is connected to the host.
It’s pretty simple and I’ll walk you through it.
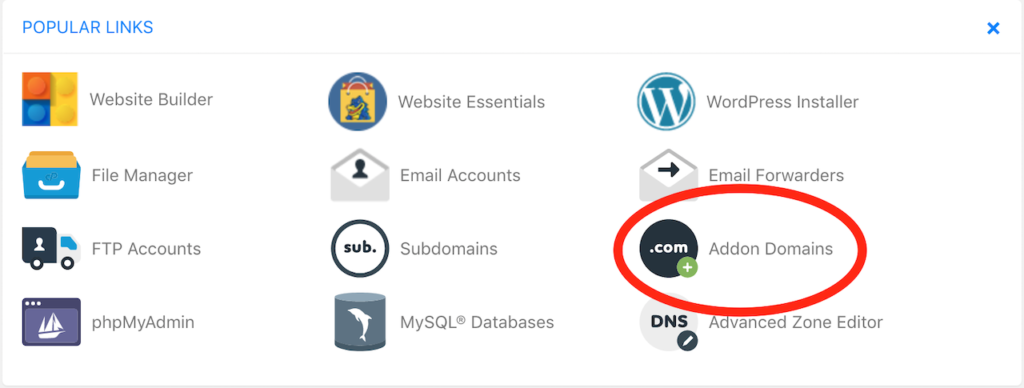
Step 1. Create An Addon Domain
So if you already have the domain you want to point to your host but when you try to access your site nothing is coming up then you need create what is called an add on domain.
This basically helps to associate the domain name with the host.
Login to your cpanel again and then locate the icon that says Addon Domains
After you’ve done that its pretty straight forward
Type in the name of your domain name in the new domain section and be sure to put .com and the other fields will automatically fill out.
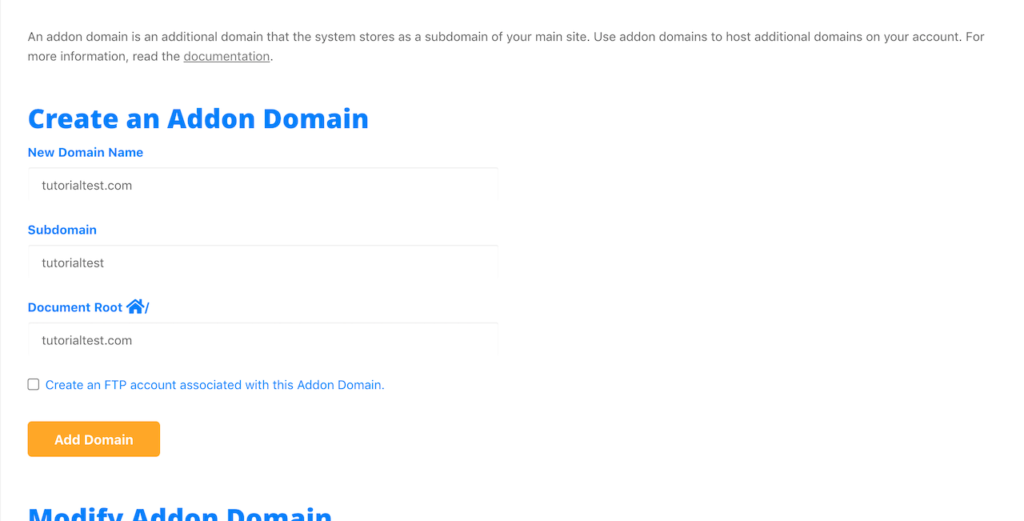
What this does is create the folders and files needed to be hosted.
Once you have created the addon domain all thats left is…
Step 2. Create Your Site
Now you’re ready to host your website and you can do this by uploading the html files manually or installing WordPress as we’ve gone over extensively earlier.
and that’s it…
you now have hosted your website.
We have gone over the many ways how you can host your very own website but there is one question that you may have still as your creating your website…
Can I host a website for free?
In short, the answer is yes.
Below you will find 10 websites that allow you to host a website for free but after I will explain some disadvantages this may be for you.
10 Different Ways To Host A Website For Free
Now I will explain some of the ways that you can host a website for free but do be aware there will be limitations to these hosting sites that you use.
Regardless you want to know how so here are your options…
1. WIX
We’ll start off with Wix.
If you are just beginning and looking for a way to get a website up and you don’t want to know any form of coding at all then Wix is your place to go.
It is an easy drag and drop website builder and if you want to continue using its free features all you need to do is continue to use the subdomain they provide you with.
This helps them as a free form of advertising for them.
If I remember well, I believe their branded logo is visible on your site.
Think of this as those ads you get in the middle of a youtube video that may ruin your experience, but if you’re okay with that then go ahead.
I think this is a good place to start if you are in a rush and you need to get something up and you don’t care about the domain name you get.
However, Wix has improved over the years and now they have created something new called Wix Code.
This enables you to go above and beyond then just the prebuilt templates they provide and create stunning web applications such as this website.
I must say I am impressed with how far Wix has come.
Of course these more advance features are beyond the free option of what your looking for but it is available if your interested.
2. WordPress.com
Now onto one of the leading platforms on the web which you can see from the image above.
One of the first questions people may have is…
What is the difference between wordpress.com and wordpress.org?
For a more in-depth analysis of the two you can read it here, but to keep it simple think of wordpress.com as medium.com…
A simple blogging platform that has everything prebuilt for you.
But before I speak to soon it looks like WordPress offers other options as well if your looking to build an online store, or even a simple portfolio website.
It’s cool if you’re looking for another way from having a self hosted site.
Just choose a template add a little customization, and I mean little, and start writing.
Not really for developers if your trying to host a custom built website.
WordPress.com is completely free as long as you stick to their requirements.
Just like Wix they will give you a free domain name which will include their name in it, but if you’re cool with that then do your thing.
3. Weebly
Weebly is another website builder platform that is similar to Wix.
I don’t have much experience with them myself but they offer a free option as well that includes a subdomain and ads on your site in order for you to use the free version.
4. Github
So I’ve gone over how you can host a website with Github already but I do have one suggestion.
This is really good for displaying projects and code.
If you’re looking to drive traffic, or send a lot people to the site, then Github would not be your best option for this, but perfect for developers : D.
5. Bravenet.com
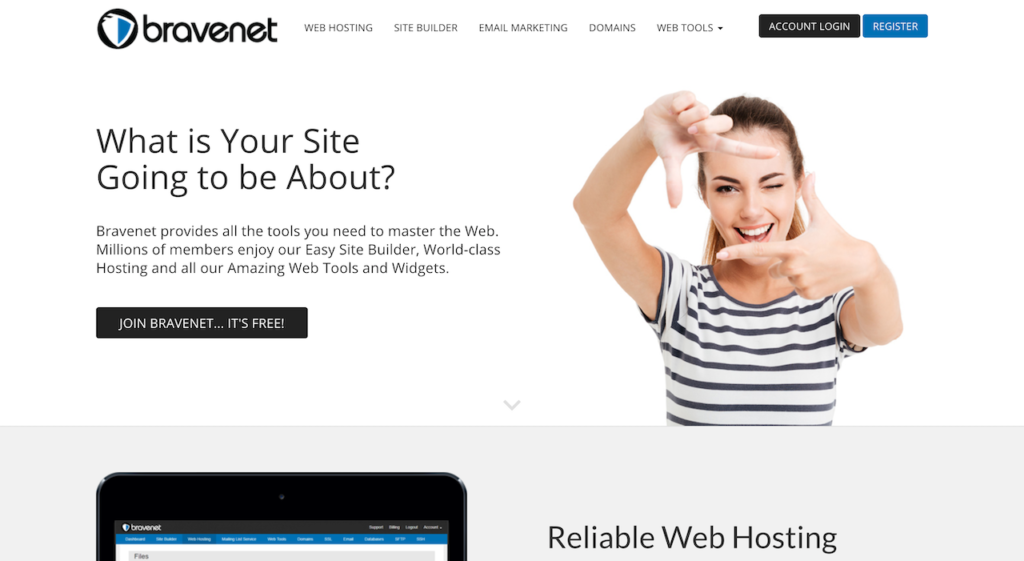
If your looking for the complete package bravenet is your go to free website builder.
They differentiate from Wix and Weebly by actually providing an email marketing tool.
This is great because anyone who knows one thing about marketing or building a business online its all about your email list.
They help you with a platform to create email campaigns.
Of course these special features are included with the paid plan but if you just want to get started then the free plan is available.
6. x10hosting
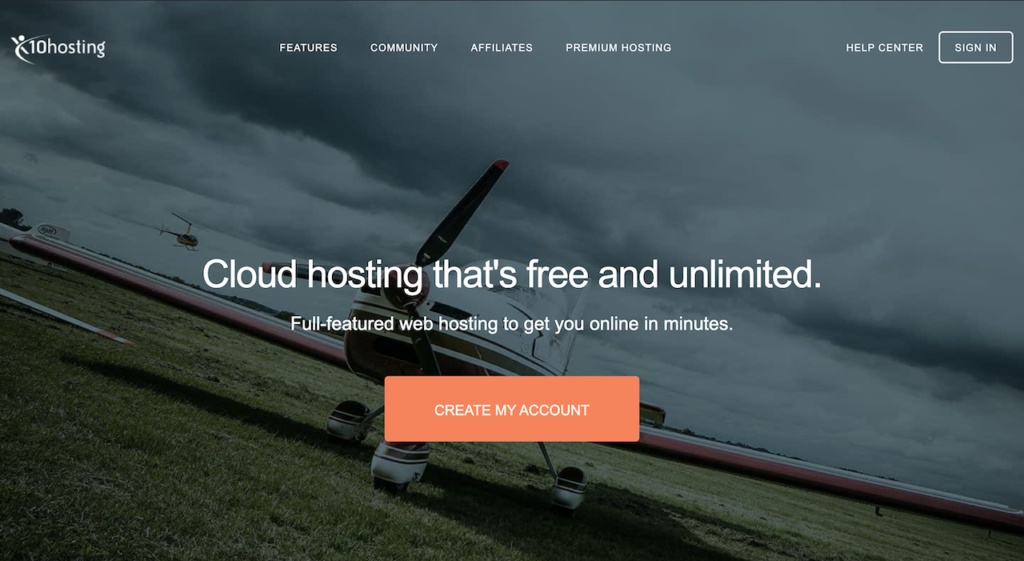
x10 hosting will seem like it’s almost too good to be true.
I say this because researching this company I couldn’t believe they were actually offering cloud based hosting for free.
But thoroughly going through their website it seems to be true.
If you already have a domain name you can use their hosting free of charge and it comes equipped with what a normal hosting provider would include like…
A cpanel, email account, and a website builder.
But yet all good things must come to an end or at least restrictions.
Even though they come with these amazing features there is a limit to what you can do like your disk storage is from 512MB – 1GB.
However, if you’re only looking to operate one site to test the waters and if you don’t need a lot of storage then go try it.
Especially since its unlimited bandwidth and cloud based hosting, it’s great for fast and reliable service.
7. Awardspace.com
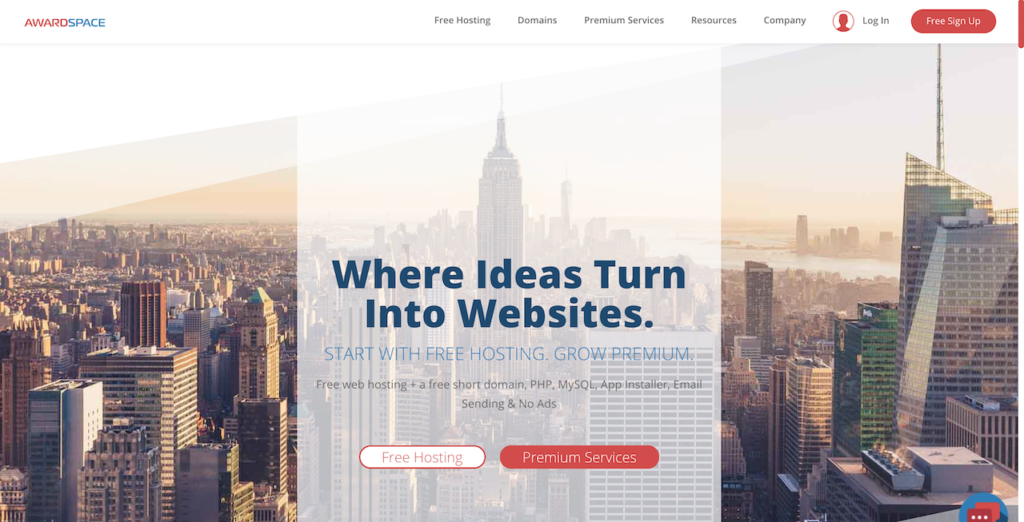
I don’t know about you but are you seeing the pattern yet?
Free web hosting is great for starting out for small websites not looking to gain a lot of viewers or when you’re in need of testing out some work.
In fact, awardspace tells you right on the home page that with the web hosting plan you’re only able to handle about 5,000 views per month.
That still pretty good for a test site or a small blog.
Again free comes with a branded domain name and restrictions but another place to get started.
8. Freehostia.com
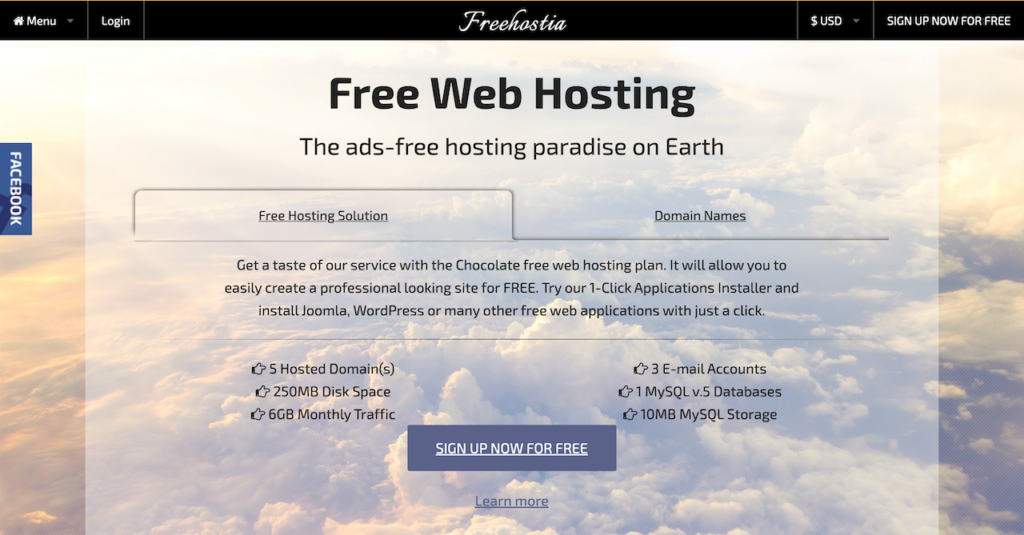
What I like about this site is they actually tell you what your gonna get on the main page.
You are able to host 5 domain names you own and you get 250MB of disk space and 6GB of monthly traffic.
According to hosting manual, for the average single webpage on a website it usually takes up 1-2 MB of disk storage.
So even if you had 5 pages and your content averaged to about 10MB you would still have 240MB of disk space.
Then 6GB of bandwith equals to about a little over 20,000 views per month.
That averages to about 667 views per day.
For a small site these are great numbers that this host can handle.
But the keyword here is a small site, so if you’re looking to build a site that requires a lot of media, graphics or photos you should consider other options.
9. Freewebhostingarea.com
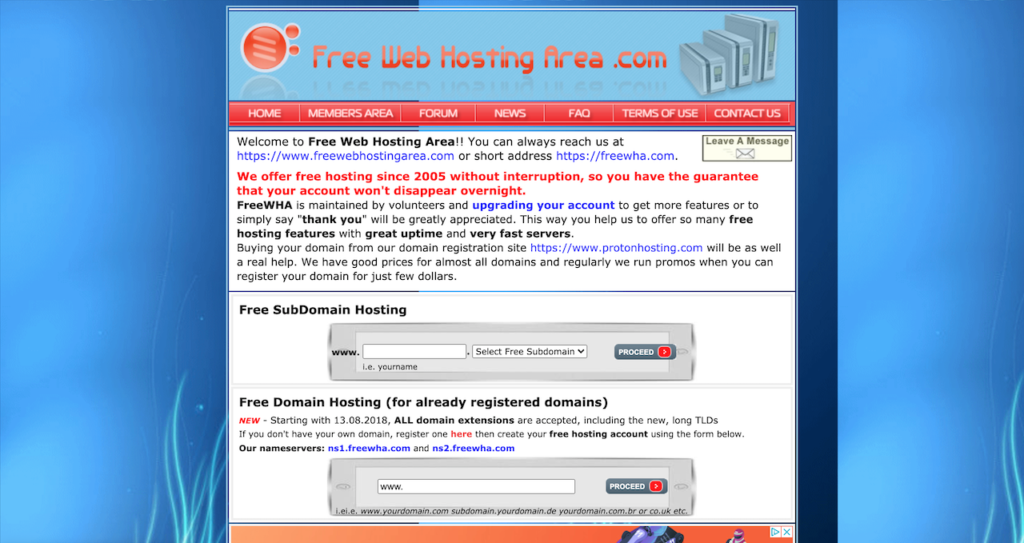
So if I am honest with you guys my first impression of this site turns me off.
But they offer free hosting so they meet the requirements of this list, therefore…
However, what’s cool about this site is it was created and maintained by volunteers.
So this was something that they believed in and they wanted to offer for free.
You can even connect your own domain for free but again here comes the stipulations.
They require that if you host with them you have real traffic visiting your site and that your site is not an adult themed site…
that’s reasonable.
One thing I know with developers is that it’s not always about the design but if the product works don’t try to fix it.
So here is another option if you’re looking for that free host to try.
10. Freehosting.com
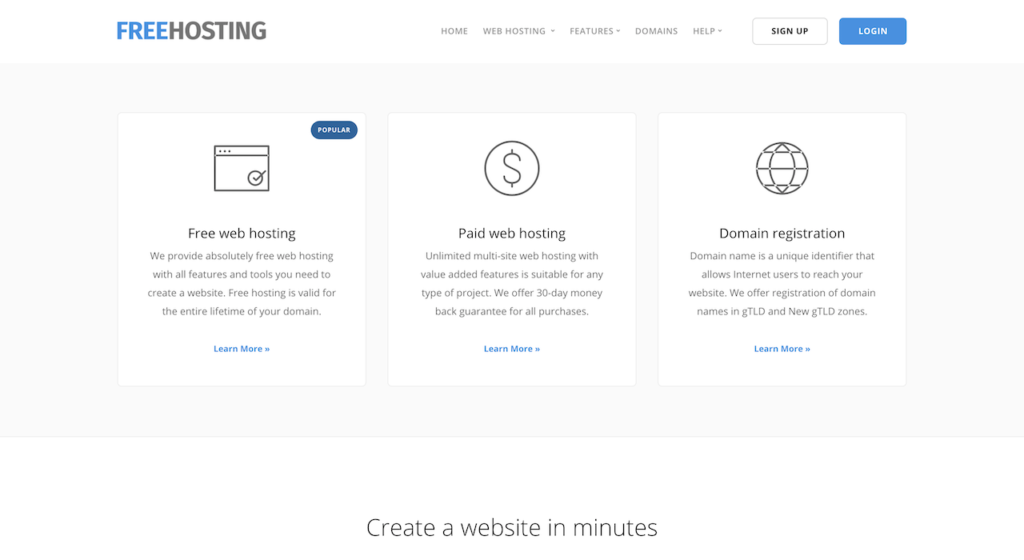
Coming up last is freehosting.com.
This is a great follow up from what we just came from at Free website hosting area.
We are welcomed with a beautifully designed page that truly just invites you to want to work with them.
They have done a great job with explaining the features they offer and I must say I’m ready to sign up.
With just their free hosting plan they are measuring up to their competitors.
Just take a look at what you get with the free hosting plan
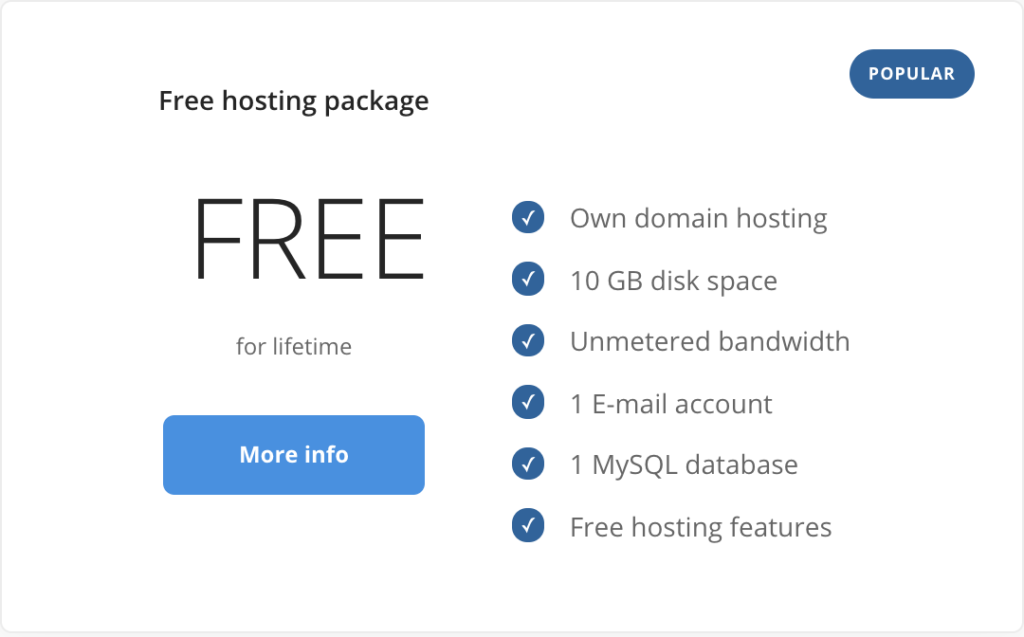
To give you a snap shot of what this means just take a look at how much disk usage my website uses.

That is about 1GB!
I have had this website for a few years now and I have about 100 blog posts and tons of media files.
So the fact that they offer up to 10GB of disk space is amazing.
They’re really making me reconsider switching lol.
Seriously though this is an amazing offer if you looking to get started with free web hosting.
What’s also cool with free hosting is they have made it for developers as well as individuals who have never coded and prefer a website builder.
There is an option for everyone.
Check freehosting.com if you are looking for a free host but always be aware that with free comes requirements or restrictions so try with caution.
Why Free Sites Are Best For Hosting A Static Website
With all these options for a free web host why aren’t a lot more people using them?
Well if you remember the old saying of you get what you pay for is true in this sense.
If you want freedom your gonna have to pay for it, unfortunately.
Especially if your goal is to grow your website into something bigger than just a simple blog.
However, as we went through the 10 free ways to host a website you can see a similar pattern in all of them besides the feature of having a website builder.
These free web hosting platforms are really ideal for static sites.
But what is a static site?
A static site is basically a collection or series of HTML files.
Meaning each web page is an individual HTML file.
Even if another page has the same elements, it is basically a duplicate of the original.
Static pages are great for these types of hosting plans because they do not take a lot of memory, or space, or as it is called in the hosting world: disk usage.
So if I had to use these platforms I would only use them for small projects.
I think these would be great for developers who develop their websites and need a way to make them live without having to spend cash on a host.
What Is The Best Free Hosting Site?
Ok so the real question after going over the 10 free ways to host a website for free is…
Which one is the best for your buck?
Ironically speaking.
Well to be honest if I was to choose one out of the selection it would be…
From just reading what comes with the free hosting plan I feel like I could do a lot with the free plan.
Knowing me I would try to push the limit and see how far I could go with their plan.
I mean you can even host wordpress on the plan.
You mean I can create a blog on the site and only pay for a domain which is like $12 for the year.
To compare $12 bucks for the year to about $100 for the average hosting company thats like a no brainer.
Especially if you want to build out a lot of sites, but if that was the case you might need to get a shared hosting plan that can handle multiple domain names.
But if its just one site I vote for freehosting.com
5 Disadvantages With A Free Website
So let’s say you want to go for the free website, but I want to lay out some of the disadvantages you should be aware of if you decide to go this route.
1. Freedom Comes With A Price
Even as much as I want to believe it nothing in life is free.
There is always something given in exchange.
Really when you think about it its science.
Newtons law states that for every action there is an equal or opposite reaction.
In other words, for whatever is given there must be something given back in exchange equally or opposite?
Does that make sense?
Hows that for someone who failed physics?
Therefore be prepared for giving more if you want more.
2. You Could Lose Everything
I am a firm believer that if you don’t own it there is a possibility of it being taken a way from you.
If your using their platform and they decide to shutdown your site there is nothing you can do about it.
I had this experience when I was selling stuff on ebay.
One of my listings didn’t meet their policy, which I didn’t know I did and they put my account on restriction.
Which meant I lost potential sales for several days and I couldn’t do anything about it.
Same can go for a free hosting site.
Granted this can still happen on a self hosted website but there are precautionary measures to avoid this from happening and on a self hosted website you are usually paying for it.
But always try to own your own property.
It’s the best advice I every got and I try to pass it on.
3. No Control
So just to emphasize those restrictions again.
Let’s say you wanted to create a small blog on one of these free hosting platforms.
If one of those post goes viral and it starts to drive massive traffic to your site 2 things can happen.
- Your site could potential crash and you lose everything
- Your gonna have to upgrade your free plan
The second option isn’t a bad thing cuz you can do a lot more if your driving traffic, but you might lose all of your hard work if you have to migrate your site.
Just saying.
4. No Improvements
Again you are limited to the design of your site, of course if you coding your site from scratch then no problem, but…
If you are building one from their templates limitations come into play.
5. No Monetization Opportunity
So here is one that might really make you think twice about a free site.
If you every thought of making money through your site like running ads on it you can forget about it.
Ad companies won’t take you seriously or rather you will not be eligible because these free sites don’t allow other ad companies to be shown on their site.
So there you have it 5 reasons you can be at a disadvantage for using a free website.
So the next question to ask is…
What Is The Best Alternative To A Free Website
So the final question to ask now is which is the best alternative if there are so many disadvantages with a free website?
Well as I mentioned before I am a firm believer of owning your own.
The next best option for owning your own webhost or website is having a self hosted website.
This means that you are paying for your hosting either on a monthly basis or yearly.
If you are seriously thinking of getting into web development it is a good investment to make into yourself.
It gives you much more room to build and create whether it’s as a web developer, a blogger, or even starting your own online business.
I personally use HostGator and have been using them for years now.
If you want to know more about why I chose them as my web hosting company then you can read about it here.
But if your ready to check them out you can do that with the link below
Conclusion
Wow, I can’t believe we made!
Ok to wrap this whole thing up.
First if you went through this whole thing thank you!
I know it may have been a lot but I really wanted to give you the many ways you can host a website as well as free options.
It’s good to know what your options are and if your looking for that way to get started and test the waters then you now have it.
After reading this you should feel like a pro knowing how to handle your way around the control panel and uploading files to a server or your web host.
You should feel like a real developer now : ).
If you still need help after going through this, or you can’t find what your looking for on your specific hosting provider…
The help docs are a good place to start and as mentioned in my article what to find in a good hosting company, their support should be available to help as well.
Well, I hope all this was beneficial and was clear.
If not please let me know and I will do my best to address the miscommunication and help you out, you can also email me.
Well that’s all for now keep building and coding…
Ya fellow Dev Mr. Wong.
If you enjoyed this you might like the following article