
So today I wanted to do something different then just an informational post. I thought a tutorial would be good for a change. A post just based on some of the things I have been learning and thought it might helpful for others out there who may be learning how to code.
I decided to make things simple and break this tutorial into parts.
This will be part one of…Hmmmm
I guess I’m still figuring out how many parts it will be, but I will break it into small parts so that when you finish all the parts you will have a complete website.
This post I will focus solely on the structure of how an HTML document works. This is the basic/standard for how a browser will read the file.
So to start things off there will be some things you will need to begin.
In order to begin writing your code you will need some form of text editor.
Here is a link to a list of editors out there for you use.
<>RESOURCES<>
The one you choose is up to your preference and which you feel more comfortable. For the most part they all do the same functions for what you need.
The one I will be using today will be Atom. Now for a disclaimer I do not know everything about Atom, as I am still learning this particular software but I will get you through the basics.
Without further ado let us begin.
Step 1. Create An HTML File
First open up your editor and click file to create new file.

Then name your file “index.html”. We first name it index as it will serve as the home page for your webpage and then we give it the tag “<html>” so the browser will be able to recognize which file it needs to access.
Great! You just begun creating your first webpage. Are you excited? You should be, you are now embarking on learning how to code as a front end web developer, but I digress. Let’s continue.
Step 2. Structuring Your HTML File
Now that you have an index.html file, let’s open it up and start to write some code. Ok, so the first set of code you will need to write is to identify what type of document it is your creating. This is very important. The following code needs to go at the top of the page
<!DOCTYPE html>
which should look like this

Side Note. to help you remember this code snippet just think ok what “type” of document you need when creating an html file. It helps me out in a weird way.
Step 3. Add <html> tags.
Ok so intro to tags. Tags are surrounded by these angular brackets “<>”. These brackets help to define the different elements you want in your webpage. But before you can begin adding other elements you will need to add html tags.
- Press enter to return to the next line and add this tag <html>
- Press enter again and add the ending html tag </html>.
If you look closely there is a difference in the tags…the ending tag has a forward slash. Most elements need an opening tag and a closing tag. Closing tags have a forward slash before the name of the element. If not, the browser will not recognize where the element ends.

ok so now were getting to the good stuff. The foundation of a webpage.
The following tags is were all your content will be held and seen by visitors to your page. It will help to create the different sections of your page as well. They are
- <body>
- <header>
- <footer>
Step 4. Adding What I Call “The 3 Foundations” Of A Webpage
Similar to the <html> tags were gonna add the following tags between the <html> tags. First will be the <head>.
- Between the <html> tags on a new line indent your cursor by pressing tab once and add the opening and closing <body> tags.
- Next between the body tags on a new line indent your cursor again, press tab to indent once and then add the element tags <header></header>
- Finally on the next line add the <footer> tags, this should be indented to the same distance as the header tags.
Your file should begin to look similar to mine

Ok, now that we have the main parts of your webpage, lets add a few more elements and content to finish creating your first webpage.
Remember this is only part one so we won’t have everything added just yet.
Alright, with that said let’s add a title for your website and a simple header and footer text.
Step 5. The Title Tag
- In the <head> tag we created enter a new line and between the tags add the opening and closing title tags <title></title>
- In between the title tag write your name.
- Skip down to the <header> tags and just like step 1 and 2, repeat and write these <h1> tags and between these tags write “Welcome to my first website.”
- Once again, skip to the footer tags <footer> and between these tags write out the paragraph tags <p></p>. Now were gonna add some text and copyright to the page.
- Were gonna learn something new. Type “©” this will give you the copyright symbol. Following the symbol you can add the phrase “Copyright 2018. My first website I created and coded.”
Your code should like this when done.

Just to break down what we did, in the <head> tag we added the title of our site. This is seen in our browsers tab, along with the favicon, the pic you see that is usually the sites logo, as seen in the image below. Anything that is placed in the <head> section will not be seen in the body of your website. In this section you would link files to your css file or javascript and even web fonts, but thats all for another time.

Step 6. Preview Your Webpage.
Ok, it’s time to preview our code in the browser.
Save your file in a folder on your desktop so you can keep track of your files so when we need them to create our other files for part 2.
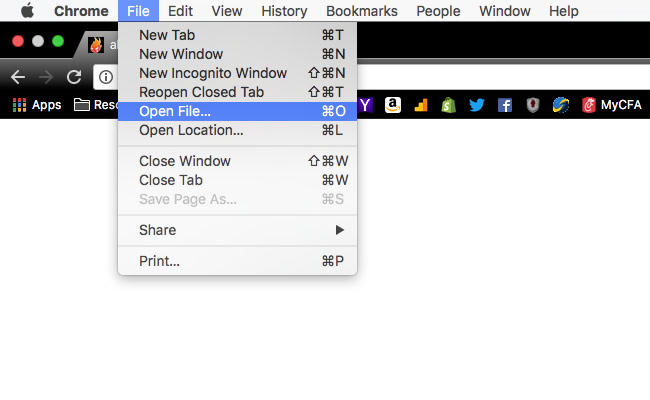
- Open up your browser,
- Go to “file”
- Select the option “open file” and select your file that says “index.html” where you stored it
Your page should look like this.

Wow look at that. You just created your first WEBSITE! Congratulations!!!
Ok, I know I know, it’s not all that spectacular, but remember this. This is step one of creating a website. Therefore you are now an official coder! I say you should give yourself a round of applause and a pat on the back.
Later we will add what is called CSS to spice up the site a bit. For now, sit back, admire your work, and take in the fact that you just created your first website. You are now on your way to becoming a Front End Web Developer.
For practice replicate and repeat writing this code so you can become familiar with the basics of an html file.
That about does it for now. Stay tuned for part two…
Coming Soon!